10 steps--a demonstration


This demonstration reflects
my mid 2003 understanding
--or lack of it--
of Prud'hon's Technique.
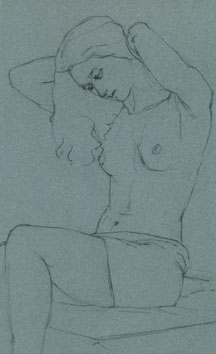
This drawing was captured in 10 steps.


1
Outline


This demonstration follows a different course than the previous one. Mainly, you will see new recommendations for the various hardnesses of the chalks. I have added more information on organizing the hatches, and I add a suggestion to stump with your fingers or use a chamois to remove tone. So lets begin...


Step 1 is the initial outline.

The outline:
places the figure on the page,
solves shape and proportion, and
maps the important tonal boundaries.


Do not go forward with any of these matters unsolved. Don't make the drawing beautiful here. Just make it accurate. Take your time.

Before going on,
step back and thoroughly consider your drawing. If anything is wrong with the placement, angles or proportions, FIX THESE PROBLEMS NOW. Don't go to the next step without taking a viewing break first. Fix as many times as it takes. Don't go on until you take that last break and see that everything is OK. The reason this is important is that each stage may become the last (so called "unfinished" part).
Remember though, stay nice and easy, like Prud'hon did.

Materials Use a black chalk that freely releases the color, so that you don't have to bear down. There should be a certain ease to your marks. Use a black that can erase and also leave a ghost with stumping. In the handmade chalks, the "hard" will work nicely. Use the harder Conte.

Next Page: Demonstration: Step 2 -- Bold Hatching
Updates | Discovering Prud'hon: Introduction to a Lesson on Technique | Why Is His Drawing Unique & Obscure? | Observations: Prud'hon's Materials | Discussion: Modern Materials | How to Make Your Own Better Black Chalks | Supply List: Black and White Chalk on Blue Paper | Observations: Parameters of Technique | Theory: Best Guess at Prud'hon's Step by Step Approach | Demonstration: Step 1 -- Outline | Demonstration: Step 2 -- Bold Hatching | Demonstration: Step 3 -- Stump Out Hatches | Demonstration: Step 4 -- Hatch White | Demonstration: Step 5 -- Hatch Black | Demonstration: Step 6 -- Lightly Stump | Demonstration: Step 7 -- Apply White Again | Demonstration: Step 8 -- Add Black Again | Demonstration: Step 9 -- Hatch, Tortillon, and Hatch Again | Demonstration: Step 10 -- Finishing Refinements | Demonstration: Steps 1 through 10 -- Visual Summary
 

What's New? | Shortcut  

Entrances: | Studio -| Alzofon Art Institute -| Idea Library | Academy | Guest Wing |


Rebecca Alzofon can be e-mailed at
rebecca@art.net
This page updated July 16, 2003
1999 by Rebecca Alzofon. All rights reserved.