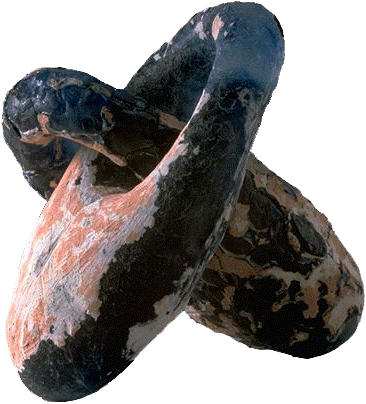
Blue Links
1/2' x 1/2' 5"
Clay cast glass with clay left on the
surface.
How Blue Links were made
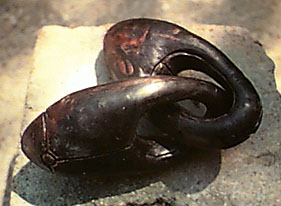
First I made them in wax.
I did that by dipping a solid glass piece with the
same shape in to melted wax. I had made it in the hotshop earlier.(I
had put vaseline on the glass so the wax would not stick to the
glass. I could also have formed something in clay and smeard some
vaseline on it and dipped that. When the wax is hard you open it up
where it will be the easiest to get out the piece inside. In my case
it was on the side. This method of mine is a great way to skip the
plaster mold stage if you don't have to have any repeated detail in
your wax piece. You can always make your marks into the wax
afterwards like I did in this case.
( see picture above.)
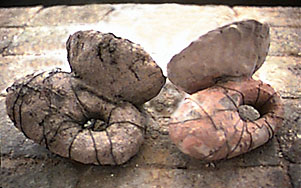
Here are two forms that show how the mold looked
like for the glass in Blue Links.
The only difference is that these were cast
separately.
The technique I used is based on bronze casting
techniques that are thought to originate from ancient Africa and
Asia. My version of the method is as follows:
- First the piece is formed in wax. ( I used a
standard brown wax. But best is to use beeswax for it has lower
melting point)
- Then a protective layer is smeared onto the
wax. This layer will not crack when it dries. People in Gana still
use this method to cast bronze statuettes. (Charcoal with slip in
it and then they use cowdroppings, clay and palmfiber to create a
mold )
- I used very corse clay to cover over the
charcoal layer and then regular clay over that and to create the
sprue cup.( the Gana people do it this part a little different and
I will not go into that here)
- NiCr wire was wrapped around the form, to keep
it together during the firing.( something I desided to do to make
sure the glass didn't go every where)
- The piece was fired upside down at a low
temperature in a gas kiln to extract the wax.
- Kiln cement was put in all the cracks that had
formed in the clay.( they do that differently)
- Put recycled Gabberts glass (broken up clear
glass (cullet( floor and glass tool schraps) from a blowing
factury) into the mold along with copper scale to create a green
color.
- Fired slowly (17 hours or so) in an electric
kiln to1600F and hold there for about 2-3 hours to make sure all
the glass had moved into the mold from the cup part. Then the kiln
temperature is taken down to annealing temperature of Gabbert
glass (950F) and and left there for about 12 hours so the glass
can get a chance to get some of it's stress out (Try to make it
rather fast. Specially beween 1200F-1100F so you don't get
divitrified glass ( The glass crystalizes - the glass becomes mat
or spotty). Then the temperature is slowly taken down (10 hours or
so) to the strain point (200F lower) of the glass. That is the
last chance for the glass to get all the stress out. Soak it there
for about 8 hours and then go in about 6 hours down to room
temperature. Each firing is different depending on the thickness
of the glass being cast. I like to be on the safe site and most
often over anneal my work. The oven can not be opened up after the
temperature has gone down to the annealing temperature for you
will be risking that your piece will break from a thermal shock of
the sudden change in temperature you create by opening up the
door. It is a good rule to let the piece sit in the kiln for a day
or so after it has reached the room temperature before you decide
to take it out of its mold. Don't run cold water on the glass to
clean it. Try to make it as close to room temperature if you need
water.
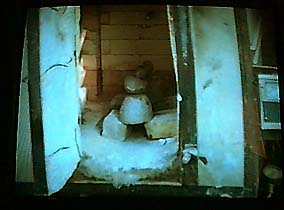
Blue Links during the wax burnout
step.
To get the Blue Links out of the mold I used a
hammer and an old sharpened skrewdriver.
I was not fully comfortable with this method and
decided to find a different way to create a closed off mold. My main
problem was the cracking of the clay because I had used a wax
type that was hard and the clay I used contracted so much around
it so there where lots of cracks that showed up on the final pieces.
So what I do now is to put paper mache around a form that I like and
take that off like it was wax, talked about above and glue it back
together and smear my clay over it. The moisture from the clay will
soften up the paper and make it give as the clay dries without
changing the form or cracks forming on the clay. You can see how I
work with that method on
this page. This way I don't have to deal
with wax burnout and I'm recycling my junk mail.
Back to my home
page