How do you join your materials (glass ceramic and stone...?)
Well most often I heat up the glass forms slowly to about 1300F on top of the ceramic and let it slump onto the clay part. That way I get a perfect fitting. Getting the stone and glass to fit I can't heat up the stone so I carve the stone so that it will fit the glass and hide the seam with lead or I carve the stone so that the glass lid goes a little into the stone so you see only the lid of the stone where the two meet. To get the two pieces to stay together I usually use glue.
PC7 or PC10 ( two part glue in cans - get at ACE hardware) or E 6000 (very strong silicon- get at TAP plastic( the West coast) or at a craft store like Michaels or of the internet if you don't live close to a store that sells this glue : ) ) or if the glass sits in a groove and cooper wire holds both pieces like in Blue Bonding and Stone Bonding then that wire is enauch.
In Brasil I work with fused
and slumped glass making bowls plates jars etc (I have two kilns).
I like very very much yours pieces with clay on surface of glass and I would
like try this nice technique. Please could you orient me about it?
Sure Ana. I don't know what type of clays you have over in Brasil but use high fire clay and bisk your mold up to the temperature you will be taking the glass. I recomend you find a blowing studio and get their scraps for blown decorative glass usually has lower melting point or around 1600F. If you bake the clay that low it will make them more brittle than your glass so the mold will break rather then your glass when you fire. Now some glass types don't like to have clay close to them when you fire. If you have number of options try as many as you can. Every glass type will give you a different result. Some will stick so hard to the clay that it will not come off. Others don't even get any of the clay on them and then there is the medium stage. If you get a glass and clay that don't stick try makeing the surface of the clay roucher so it will have some meat to stick to or try fireing higher. If the glass sticks too much to the clay try to polish the clay when it is leather hard so it will have less to stick to or try fireing lower. If you don't want any sticking put kilnwash on the inside of the mold.
The best kilnwash I have used is
50/50
China Clay and Alumina Hydrate by volume
If you lessen the Alumina you get more sticking.
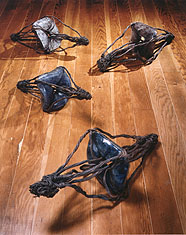
Use a claybody that has very little shrinkage or as close to the shrinkage of the glass you are useing. Sometimes if I use very thin layer of kilnwash I get some sticking that pleases me. I also noticed that where there is solid color in the glass that part seems to stick more to the glass then the clear part. So by putting oxides into a glass that dosen' t like to stick will most likely make it stick a little. Your clay molds should not be thicker than 1-1 1/2 centimeter or they get too strong. Also try to make them even in thinkness. If you make a piece that has a opening in the middle if will most likely break. You can try to refuse it. Sometimes that works but you really have to get a glass type that is really similar in contraction as the mold and the glass cools down that they will be doing that at a similar rate. To get different colors of clay on your surface you can try smearing colored slips of clay on the inside of your mold as it is starting to harden a little. That way you can make designs on to your glass (some of it might not stick - it depends on colors sometimes). You can also make light shribble into the clay and that will also show up on your clay. See Pink Form ('95) for texture and Form with Loose ends (94) for slip application.
For your first try be free as a bird but make sure you take down notes so you know what you did.
I recomend making little tests tiles with edges without under cuts so you can get the glass out again and number them and write down what you did for each one.
I had my best results with Louie glass and Gabbert glass my worst with Bullseye glass.
Hello Kristin
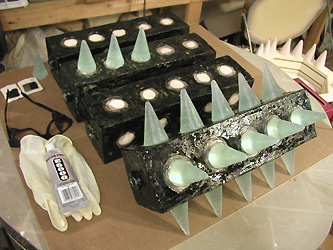
I have not made lots of molds as I am a real beginner. I did make molds of the fingers of one hand, out of clay, and bisque fired. I filled the molds with crushed beer bottles, and fired them. The glass fused together, but It did not melt, and again your web site was a great help, as I found there I had not taken them to a high enough temperature. I have remade one mold for I broke off one finger to check the results, and will fire them now to a higher temp to get a better result. I hope to attach them to something made of clay. I am studying a bachelor of visual art, and this unit is clay and glass. I have fallen in love with both, and gone the whole hog and bought a cheap electric kiln.
A question - when you use safety glass, do you remove the plastic layer between the two sheets of glass? My husband picked up a broken windscreen for me the other day. I love the green tinge.
Thank you for answering
Regards Deb from Australia
I should warn people about the front shield car glass. The resin that they laminate in it is not good to breath and to burn it is even worse (dioxin). I peeled of some glass of a car front window that was given to me and made some work with it. It took a lot of time to do that for the glass really sticks to that plastic. Make sure you have glasses and gloves and lots of moving air around you. It is hard to get tinted tempered glass but the best place I know of to get it is in a body shop. They usually have a pile of damaged car parts and you might find a door or two that still has unbroken glass in it. What I do is I have a heavy hammer with me and a tarp and lay the tarp under the door after I have cleaned the window and then just smashed it right there. The glass goes on the tarp and I then put it in a plastic bucket. Always make sure that only one window goes in each bucket for you never know if the glasses are compatible. Do not get the glass that is vacuumed or brushed of the floor of those places that replace car windows. And I am sorry to say same goes for mixing beer bottles. believe me I have tried . If you find gallon glass bottles (often used as moon shine bottles= brewing) you can get a whole lot made out of just one. Let people around you know what you are looking for and glass will come to you. If you like the green color try plain window glass. You just have to score the glass and break it into little pieces to get it into your molds. Time consuming but if you have bigger molds you can just stack sheets of glass in the mold. I have done glass bases for some of my work that way see work made 2000 for the Gallery Fold show. That glass was smoke colored so it came out like it was black when cast. Good places to get regular window glass is places that sells made to size glass, like for tables, odd size windows and such. They always have scraps to give and even orders that were made wrong or never picked up. Frame shops have also glass to give, just make sure it is just their glass for again you don't want to get different type of glass mixed in.
Here below is a list of questions that I got from some glass people in England. The outcome became a CD with lots of info from many artists that work with glass. The projects name was
Mixing with the Best
(Investigation and comparison of contemporary working methods and
mould making materials for use in the kiln forming of
glass)
by Angela Thwaites. publised 2002
Her research project looks into the properties, strengths and weaknesses of different mold mix materials and combinations. The research, was published in 2002, Her recearch has produced the most comprehensive study to date of different practice across the UK, USA and Europe. The findings have the potential to enhance the effectiveness, scope and flexibility of everyone working in the Kiln Formed Glass Arena.
See more info here and here and
Since I sent them my info I have been altering my answers to their questons as I refine my method.
I desided to do that so you will always get my uptodated answers to their questions.
KS&AT 99 Mould Mix Questionnaire
>>
Name of artist: Kristin Gudjonsdottir
>>
We have devised this list of questions in order to identify current practices in the area of mold making for kilnforming glass. It would be extremely helpful to our project if you could take the time to answer them, in as much detail as possible, and also add any comments and observations you may have.
>>
Section one: techniques :
>>
1) Describe the kiln forming techniques you are using e.g. casting,slumping,pate de verre etc.
I cast all my glass in ceramic molds. They can be both open face or closed off. see: http://art.net/~stina/TwoRingFormInMaking.html
and the closed off way
http://art.net/~stina/claymolds.html
>>
2) Are you making your models in wax? If not ignore the next two questions and elaborate on what you do use.
I can't really use wax for that would break the claymold as it would be drying. Except when I use my version of a Gana bronze casting tecnique. http://art.net/~stina/BlueLinks.html
>>
3) Are you steaming as opposed to burning out the wax?
I would put the molds up side down and have a pan under and heat up so the wax drippes out into a pan. I will not burn it. see pictures: http://art.net/~stina/BlueLinks.html
>>
4) Does the kind of wax you use affect the mould surface?
Yes for hard wax (the standard brown wax) is harder on the clay mixture and will break up the texture I have on the surface. Beeswax is better in getting detail.
>>
5) How concerned are you about the surface condition of the glass upon removal from the mould (do you always anticipate extensive cold working)?
No just burrs and a little bit of kilnwash that I have to get off.
>>
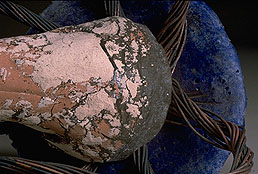
I like crusty surfaces ( clay fragments embedded in the surface or copper) but I like to be able to see into the glass in sertain areas. If I polish the glass I will use diamond pads 80 up to 400 and if I slump one piece on top of another I let the kiln airpolish the glass after the 400 step.
see:
http://art.net/~stina/96WorkBeingMade.html
>>
Section two: mold materials and their use:
>>
1) What basic mould mix are you using? including modifiers, if any?
>>
When casting soft glass like used in blowing. I use highfire clay bisked at 1600F (cone 012). If I am using window glass, bottles or tempered glass I take that same clay up to cone 04. I put kilnwash on the inside if I don't want any sticking. If I want sticking I don't put any or very thin layer. That dosen't work will all glass types. Specially not with Bullseye it seems to be a very "wet" glass and penetrates the kilwash.
>>
2) Does the recipe change according to size, complexity, surface detail, open face mould or closed form etc.? i.e. more or less water, coarser or finer silica...
>>
my claymolds thickness stays always the same. They have to be rather thin to allow the glass to rule over the clay so it dosen't break.
>>
3) Do the types of glass you are using influence your choice of mould mix?
It influences if I will be doing an open or closed mold. Some glass types contract more then others during cooling. So I use Louie or Gabbert glass (cullett) that have a low contraction point for closed off molds and those that have undercuts and what ever glass I get my hands on for the plain open face molds.
>>
4) Do you use coloured glasses, and if so does this effect your choice of mould mix?
Yes I do and also mix oxides into the glass to get color variations.
No if will not affect my choice.
>>
5) Do you use a seperate recipe, for the face coat, from the body of the mould?(i.e.to pick-up finer detail, to reduce flashing,etc.)
I might add a litle bit of talc to my kilnwash to get more detail in areas. Kilnwash mixture is 50/50 by volume China clay and Alumina Hydrate.
6) Do you have any rule of thumb to determine the relative thickness of
your mould to the size/mass of the piece?(as this will obviously affect the annealing time and cost).
The molds are always about 0.5 cm (~1/4" Inches) thick. so I don't take them into account.
>>
7) Do you use a mould separator, and if so what form does it take and under what circumstances do you use it?
NA
>>
Section three: glass
>>
1) What kind of glass are you using and why; include the physical
properties of the glass:softening point, annealing point, strain point etc.?
Some been answered in different places. Annealing point 925F for the shop glass (East Bay Special) 950F for Gabbert and Louie Glass and 1010-1027F for the safety glass. I always make the strainpoint numer be 200F lower then the annealing point.
>>
2) In what form is the glass that you are using
e.g.ingots/billets/grain/cullet etc.?
cullet, frits
3) Where do you source your glass?
At blowing studios, Their trash glass bin or what ever I find or is given to me such as tempered glass, windows and big bottles.
>>
4) Do you ever have a problem with mould mix sticking to the surface of the glass after firing? As a result, have you changed your mould mix recipe or the type of glass used? If so please describe the problems and the changes.
>>
I usually get some sticking where there has been a direct contact between kilnwash/color or kilnwash/oxides. I take most of it off with 400 grid diamond pad or a little sanding stone.
The only glass that I have had real problems with is Bullseye. It really sticks so chunks of clay pulls out of my molds and or the glass breaks even through a thick layer of kilnwash.
>>
>>
5) Is the glass placed directly into the mould or trickled in via a
reservoir/flowerpot/flask?
>>
Usually straight in but for the closed off once I make a clay resevoir that is part of the clay mold. see pictures on my website to see that.
>>
6) Would you consider using waste glass (reservoirs & sprues) in subsequent
castings? why/why not?
>>
Sure if it would benefit to have sprues I would.
>>
Section four: kiln firing
>>
1) Describe your kiln(s) e.g. electric elements on 4 sides etc.
>>
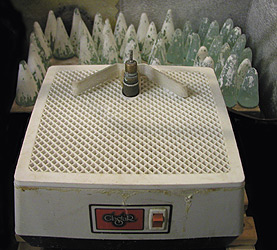
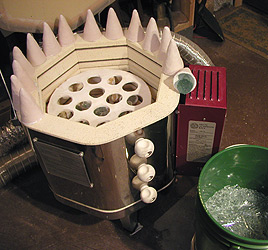
I use a ceramic kiln with digitry on it. The kiln is from Skutt. Their biggest one before the oval one and then their second or third smallest kiln.
I use an enviro vent on the big one to get an even temperature. I have found that to be most helpful to get out a vertical casting in one piece and to be able to cast and slump glass on more then one shelf in the kiln. I normally have 3-4 shelves packed with molds in the big one. There is about 200F difference in temp from the bottom of my kiln to the top if I don't have the vent on.
they have a website www.skutt.com
>>
1) What temperature range(s) are you working within?
Slumping at around 1300F
Fusing at around 1600 F for most glass but for the tempered glass 1990F or so (Cone 05 - (04 seems to be need for some tempered glass)
>>
2) Do you subject the same piece of glass to multiple firings? if so how
does this affect the physical properties of the glass? Does the mould mix change?
I sometimes fire my pieces twice. Fuse once and then slump once. if I see a break in the glass I fire again and then either up to 1300F or 1600F depending on the piece. Refireing dosen't harm the mold for it is clay and dosen't break up that easily. I use my upen face molds over and over again.
>>
>>
3) Do you find it better to go to a higher temperature for a shorter time,
or stay longer at a lower temperature? Your reasoning? Does this change for
different glasses?
For safety/tempered glass I go fast up (4 1/2 hours) from room temperature and fast down ( ~ hour or so) to annealing temperature only stopping for max 15-20 min up at 1990F. That is to make sure I don't get devitrification on the outside of the piece and on individual glass fragments.
I also found that soaking for a long time at the highest temperature with the recycle blowing studio glass was bad. I would get lot of divitrification if I staid longer than half an hour up there. I can easly soak Gabbert or Louie glass for as long as 6 hours at about 1550F. I did that sometimes to get the most intense coloring from the oxides I put in with the glass ( copper oxides, MnO2, Cobalt oxides). Recycle glass that is red, orange and yellow are always incompateable to the clear glass the color sits in when I have tryed to used these colors so I have only used these colors in one piece "One Off" made in 1999. I let the glass stay in the molds after I fired it so it is contained and can therefore break up as much as it wants without going anywhere but still look good.
>>
Section five: additional comments:
>>
I am sure my casting info is most likely among the stranges you get. If you get any that use clay like me let me know. I'm always looking for someone out there that uses clay as a mold material. Found one sofaar. Also an Icelander to my biggest surprise. But she uses it in a totally different way.
She uses the mold after have fired in it as part of the sculpture either with the glass still in it or close by (glass used: window glass in a ceramic kiln (gas). She didn't know anything about annealing just let the kiln cool down slowly and had good results.) The first piece I saw by her was a big glass swan wing (I think it is belongs to the Reykjavik Municipal museum) and if she had used a plaster/silica mold to make that wing it would have weighted a ton but this way she even could have used the mold to make couple of wings and still can ;) The clay (high fired with lots of grog) worked both as a support structure for the plaster she poured in it and the plaster worked like a buffer to combinsate for any major contractions in the glass for the piece had lots of rippels to immitate feathers. You can't do that with plaster and silica molds. Beside she was useing window glass so she was going up rather high something plaster molds don't like and you would get lots of flashings if you did that. Annealing time is cut dramatically for the clay mold walls are not nearly as think and you can therefore get a bigger piece into your kiln. Have no moisture slowly destroing your kiln as you burn out your wax and dry the molds, beside you can hold it with out breaking your back and you made bearly any mess in your studio and didn't have to breath in the plaster and silica dust as you were mixing. You don't have to support the mold (box it in so you don't get as much flashing or lessen the risk of it breaking and flooding your kiln with glass) you can stack your ceramic molds in your kiln like you were fireing ceramic pieces, shelf after shelf. That is hard to do with plaster molds. Even if a mold breaks that usually happens only when the glass is soo cold that it will not run anywhere just deform a little in the spot where the mold gave. It has happened about 3 times or so to me and always when I was makeing a circle (donut shape) Gabbert or Louie glass is the best stuff for doing those for the glass wants to contract around the hole. Some times when there is a slight undercut in the mold, I can still get the piece out and use the mold but the mold cracks a little. I put then a NiCr wire around it to make sure it dosen't break more. I even have some molds that are in parts that I put together again every time I have to use them. Just that nicrome wire and then lots of kilnwash in the cracks so it dosen't show up on the piece. Sometimes I wet form a little bit of fiberblanket in a place of a lost ceramic piece if it is small enough and put kilnwash over it to get the same affect as is on the rest of the piece. Square Forms are a great example of that. I just keept useing the mold until it was in just too many parts. I got 7 parts out of it and pressed one of the casting into a sand mold to get the 8th so I could get 4 sculptures out of them.
I have been asked to write a little bit about my clay casting for a glass book coming out. Here is the text before I shrunked it to fit a certain number of pages I had been given.
Ceramic Kiln Casting and Recycle Glass
